
How to create routines?
The routine planner is a powerful tool that lets you create personalized workouts for your clients. With it you can organize exercises, define sets, reps, and loads, and structure workouts in a visual and intuitive way.
What the planner is
The planner lets you create structured training routines organized by days and weeks. Each routine can contain different types of blocks and elements that you can organize and customize to fit your client's needs.
Block types
The planner includes different types of blocks you can use to structure workouts:
Exercise blocks
Contain specific exercises with their sets, reps, and loads. You can add multiple exercises within a single block.
Text blocks
Allow you to add instructions, notes, or descriptions that the client will see in their app.
Rest blocks
Indicate rest periods between exercises or sets.
Planner elements
Exercises
Each exercise can have:
- Sets: Number of sets to perform
- Reps: Number of repetitions per set
- Load: Weight or resistance to use
- Time: Duration of the exercise (if applicable)
- Distance: Distance to cover (for cardiovascular exercises)
- Pace: Target pace or speed
- Required photo or video: with Ask the client for, under the camera icon on the card, your client can't complete it without posting it (guide)
Once assigned, the Activity button on each card gathers what your client comments, posts and logs on that exercise, and you reply from there: How to comment on and review the activity of each exercise?.
Reordering
All elements in the planner can be reordered:
- Drag and drop blocks to change their order
- Reorganize exercises within a block
- Move elements between different days or weeks
How to create a routine
- Select the day of the week where you want to add the workout
- Add a block by clicking the corresponding button
- Add exercises to the block from your library
- Set the sets and reps for each exercise
- Adjust the load according to the client's level
- Reorder elements by dragging them if needed
Advanced customization
Copying elements
You can copy entire blocks or individual exercises to reuse them on other days or weeks.
Duplicating weeks
If you have a full week configured, you can duplicate it to maintain the same structure in future weeks.
Templates
Save routines as templates to reuse them with other clients or in the future.
Editor bar and keyboard shortcuts
On a computer, a client's plan and the program editor share the same top bar:
- Menus. Plan (or Program), Copy and paste, Add, Weeks, View and Help. If an option is grayed out, hover over it to see why.
- Selected day. Paste and the Add menu act on the last day you clicked, which is outlined in blue.
- What do you want to do? The search box in the middle of the bar (Ctrl/⌘ + K) finds any action by typing its name, including jumping to a specific week. Some options have a Learn more link to their guide.
- Navigation. On the right you have Undo, Redo, Copy this week and the arrows to change week (or month in the monthly view). Click the text between the arrows to pick a date (or a week, in programs).
Help → Keyboard shortcuts (Ctrl/⌘ + /) shows the full list. The main ones:
| Shortcut | Action |
|---|---|
| Ctrl/⌘ + K | What do you want to do? |
| Ctrl/⌘ + Z / Ctrl/⌘ + Shift + Z | Undo / Redo |
| Ctrl/⌘ + C | Copy this day |
| Ctrl/⌘ + Shift + C | Copy this week |
| Ctrl/⌘ + V | Paste on the selected day |
| Esc | Unmark what you copied |
| Delete or ⌫ | Delete copied days |
| B | Add an exercise block to the selected day |
| G | Go to a date (or a week, in programs) |
| T | Go to today (client plans only) |
| M | See the whole month |
| Ctrl/⌘ + P | Download as PDF |
Shortcuts do not work while you are typing in a field, so copy, paste and undo inside a set keep working as usual. If you have text selected, Ctrl/⌘ + C copies the text, not the day.
On mobile there is no menu bar: the plan options are in the header's ⋮ menu.
Usage tips
- Start with simple blocks and add complexity gradually
- Use text blocks to provide context or important instructions
- Reorder exercises according to the logic of the workout (warm-up, main work, cool-down)
- Check the client view to make sure everything looks correct
Hide days from the client
You can prepare future weeks without your client seeing them yet. A hidden day stays in your planner with all its content, but in the client's app it looks empty, as if nothing had been assigned yet. It works in each client's plan (not in library programs).
Hide a day
In the client's plan, open the day's ⋮ menu and choose Hide day.
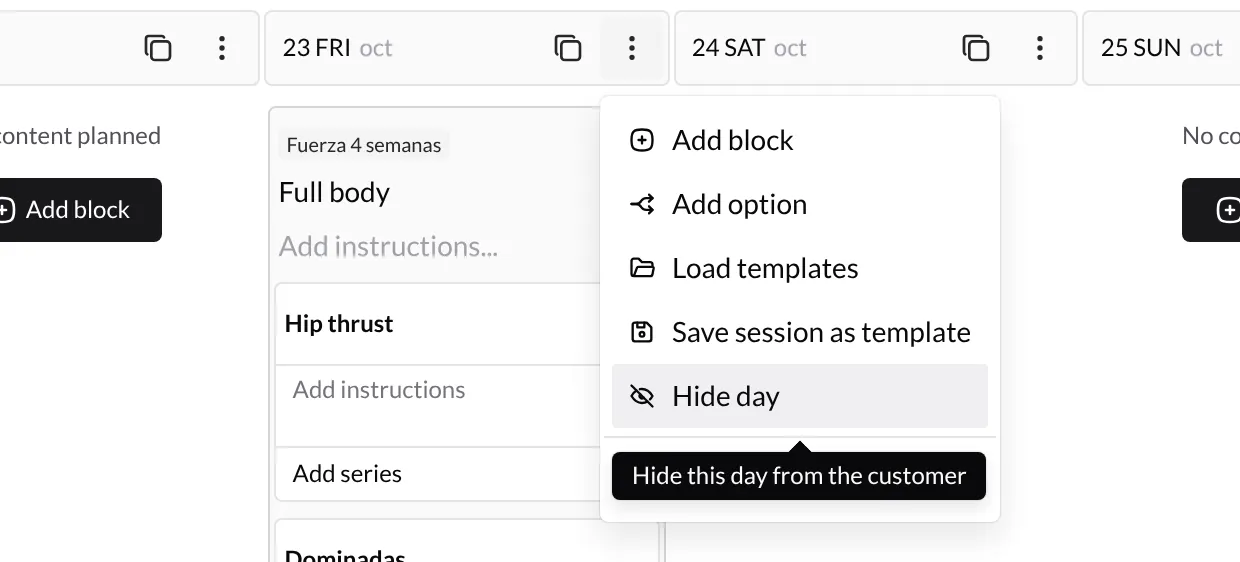
The day header turns orange and shows the Hidden label. Hover it for a reminder that the client won't see anything scheduled that day until you show it again.
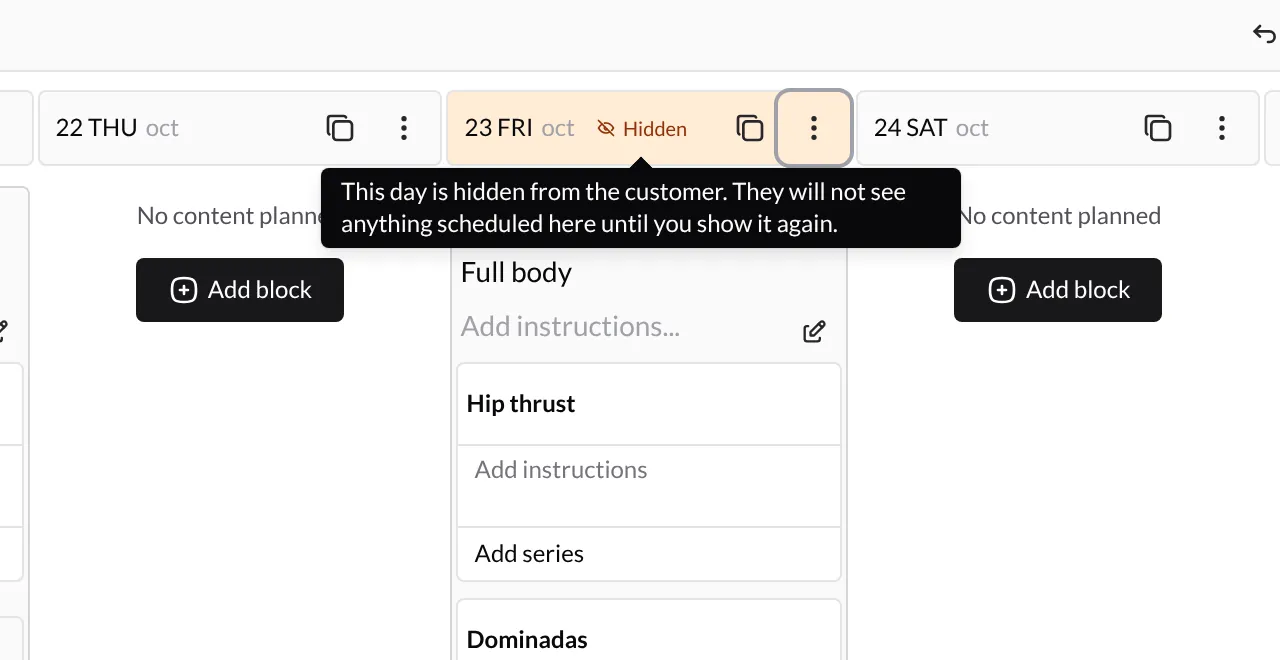
To publish it, open the day's ⋮ menu again and choose Show day. The client sees it in their app straight away.
Hide or show several days at once
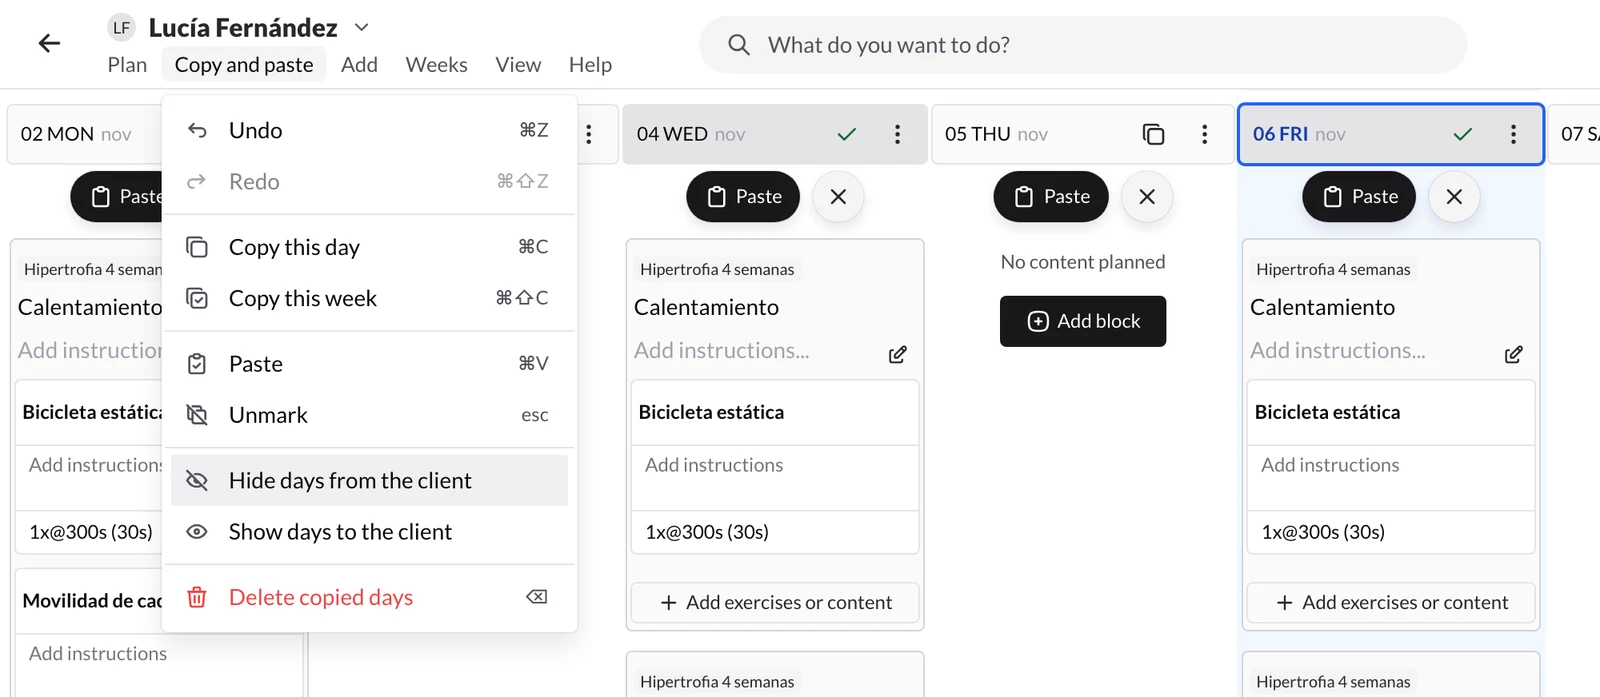
- Mark the days with the copy button on each header (Select day). On a computer, to mark the whole visible week, use Copy and paste → Copy this week.
- Open Copy and paste and choose Hide days from the client (or Show days to the client to publish them).
On mobile, open the header's ⋮ menu: Select week marks the visible week and Hide selected days or Show selected days change their visibility.
Keep in mind:
- The date is hidden, not the workout. Anything you add or paste on a hidden day later stays hidden until you show it.
- You can keep editing a hidden day as usual.
- When you export the plan, hidden days are left out unless you tick Include hidden days.
Export the workout
You can download a library program or a client’s plan as a PDF or Excel file. Follow the guide to choose the format, period and content you want to share.
Export workouts to PDF and Excel
Additional resources
- How to create clients - Guide for adding new clients
- Create clients - Add clients to your account
- How to create and assign programs? - Build reusable programs and assign them to one or several clients
How to customize your app?
Set up your app's name, icon, logo, and colors so your clients see your brand, not TrainerStudio's.
How to prescribe exercises with sets and training variables
When you add an exercise for a client you decide its sets and what is measured in each one. Learn to use the set editor to prescribe strength with reps and weight, or endurance with minutes, distance and pace.